《SystemVerilog for Design》笔记
Posted on 2021-04-04 21:01 in IC
- Chapter 1 Introduction to SystemVerilog
- Chapter 2 SystemVerilog Declration Spaces
- Chapter 3 SystemVerilog Literal Values and Built-in Data Types
- Chapter 4 SystemVerilog User-Defined and Enumerated Types
- Chapter 5 Systemverilog Arrays, Structures and Unions
- Chapter 6 Systemverilog Procedural Blocks, Tasks and Functions
- Chapter 7 Systemverilog Procedural Statements
- Chapter 8 Modeling Finite State Machine with Systemverilog
- Chapter 9 Systemverilog Design Hierarchy
- Chapter 10 Systemverilog Interfacees
- Chapter 11 A Complete Design Modeled with SystemVerilog
- Chapter 12 Behavioral and Transaction Level Modeling
- 附录
Note
- 本书假定读者已经掌握了 Verilog,主要内容是从对比角度介绍 SV 如何让设计者在更高层次对硬件进行建模,如何更高效地进行开发
- 笔记只记录了可综合的语法特性,略去了不可综合的部分
Chapter 1 Introduction to SystemVerilog
Verilog 的标准:
- Verilog-1995 (
IEEE Std 1364-1995) - Verilog-2001 (
IEEE Std 1364-2001) - Verilog-2005 (
IEEE Std 1364-2005)
SV 的标准:
- IEEE Std 1800-2005
- IEEE Std 1800-2009(合并 IEEE 1364-2005 和 IEEE 1800-2005)
- IEEE Std 1800-2012
Chapter 2 SystemVerilog Declration Spaces
Verilog 中的 wire, reg, task, function 只能声明在 module 内部,这样做的缺点就是:同一个 taks、function 要在多个 module 中进行重复声明,不仅增加工作量,还可能出现多个相同功能的副本不对齐的错误。
package
SV 新增的 package 可以解决上述问题,在其内部可以声明的有,
parameter,localparamconsttypedeftaks(必须是automatic)function(必须是automatic)import
要在其他 module 中引用 package 中的声明,可以有 4 种方式:
| 方式 | 限制 |
|---|---|
用 :: 直接引用 |
多次使用时每次都要写完成路径,繁琐 |
通过 import <name> 明确导入 |
如果要导入多个,依然繁琐 |
通过 import * 通配符导入 |
实际上是把 package 加入到搜索路径中,优先级最低,端口上依然要通过作用域符号引用 |
导入到 $unit 中使用 |
可以去掉端口上的作用域符号,缺点见下文 |
task 和 function 必须带上 automatic,而且不能包含静态变量,这是因为例化的每个 task/function 必须都有自己独立完整的一套资源,相互之间不能共享。同理,package 中也不能定义变量(logic/wire/reg),它们是不可综合的。
$unit
SV 定义了一个 compilaton unit scope 的概念(即在 module、package 之外的区域,类似于 C 语言中的全局变量),可以存放一些独立于 package、module,interface 的声明:
- variable
- net
- constant
- typedef, enum, class
- task, function
Warning
$unit 不是全局的,只对那些与其同时编译的源文件可见。每次编译的时候会产生一个专属于这次编译的特定的 compilation unit scope,如果几个文件分开编译,就可能产生某些信号不可见的情况,这是非常危险的!直接在 $unit 中做声明是非常不好的习惯,会产生混乱的代码,维护、复用、debug 都非常困难。
SV 标识符的搜索策略: 本地声明 > 通配符导入的声明 > $unit 中的声明 > hierarchy 中的声明,完全向后兼容 Verilog 的搜索策略。
Note
所有的标识符和类型定义必须先声明后使用。
如果一个标识符没有定义就使用,那么 Verilog 会自动隐式地将其声明为 net 类型(一般来说就是 wire),而且编译不会报错,所以可能会导致很微妙的错误:
1 2 3 4 5 6 7 8 9 | |
总之,把 package 导入到 $unit 中会遇到很多问题:
- 对文件编译顺序有要求
- 多个文件分多次编译和同时一次性编译的效果不同
- 可以通过条件编译的方式解决,但仍然需要注意很多细节
summary
Important
- 不要在 $unit 中做任何声明,所有的声明都应该放在有名字的 package 中
- 在必要时可以把 package 导入到 $unit 中(比如某些 module/interface 中包含了定义在 package 中的自定义类型)
- 不推荐使用 $unit,应该用 package 来规避相应风险。
Chapter 3 SystemVerilog Literal Values and Built-in Data Types
literal assigments
Verilog 中赋值全 1 的方法是不可扩展的(line 8),只能通过一些小技巧来实现(line 9~10):
1 2 3 4 5 6 7 8 9 10 | |
SV 新增语法可以实现可扩展的赋值:
1 2 3 4 | |
variable
SV 中对一个信号的定义包含两部分:
type:一共有两种,定义了信号是 net 还是 varibaledata type:一共有两种,定义了信号是 2-state 还是 4-state
| type | example |
|---|---|
| varible | var, reg |
| net | wire, wor, wand |
| data type | example |
|---|---|
| 2-state | bit, byte, int ... |
| 4-state | logic |
logic 实际上并不是 type,而是 data type,表示信号取值是 4-state。只使用 logic 会自动推断出一个 variable,所以它可以和 var 配合起来,显式地定义。从语法上来说,logic 和 reg 等价,但是它不会像 reg 一样模糊不清。而 net 类型必须是 4-state data type,所以它也可以和 logic 配合显式定义。
1 2 | |
bit 同 logic 一样,它并不是 type,而是 data type,表示信号取值是 2-state。只使用 bit 会自动推断出一个 variable,所以它也可以和 var 配合起来显式定义。
1 | |
基本上 variable 可以替代所有的 reg 和 wire,它可以出现在 always_comb, always_ff, assign 这些地方。但是有一条限制:
variable 不能被多个源驱动。
这个限制可以帮助我们避免设计中的 bug,因为绝大部分设计中信号都应该只有一个驱动源。
signed and unsigned
SV 中的 byte, shortint, int, longint 默认是 signed 类型,可以通过显式的方式声明为 unsigned 类型,需要注意的是声明时 singed/unsigned 关键字只能放在 type 关键字的后面。
int s_int;  // signed 32-bit varibale
int unsigned u_int;  // unsigned 32-bit variable
static and automatic variable
Verilog-1995 中所有的 varibale 都是 static 类型的,因为它们都是用来对硬件建模的,所以天然就是 static 类型。到了 Verilog-2001,task 和 function 中的 variable 可以声明成 automatic 类型,意味着这个 variable 的存储空间是由工具自动动态分配的,不再使用时会自动释放空间。automatic 类型主要是用来做验证或者是总线的功能模型。它有个作用是在多次调用的 task 中,使得在前一个 task 没有结束时可以进行下一次调用。
type casting
Verilog 只能在 assign 时进行类型转化,或者是调用系统函数 signed/unsigned。SV 新增的类型转化可以直接在表达式中进行,不需要 assign 语句。SV 的类型转化分为两种:
-
static(compile time) cast 静态转换是可综合的,发生在编译阶段,而且不会检查转化后取值是否正确,所以一定要小心处理!
 1
 2
 3
 4
 5
 6
 7
 8
 9
10
11
// type casting: <type>'(<expression>) 7 + int'(2.0 * 3.0) // cas result of (2.0 * 3.0) to int, then add 7 // size casting: <size>'(<expression>) logic [15:0] a, b, y; y = a + b**16'(2) // cast literal value 2 to be 16-bits wide // sign casting: <sign>'(<expression>) shortint a, b; int y; y = y - signed'({a,b}); // cast concat result to a signed value -
dynamic(run time) cast 动态转化(系统函数 $cast),是不可综合的
Important
- 声明只包含 data type(
logic,bit),没有 type 时,默认推断出 varibale - 关键字
var是可选的,并不会影响综合和仿真行为,只是增加代码可读性 - 只有
var没有 data type 时,默认是 logic 类型 - net 类型(
wire)取值只能是logic类型(声明时 logic 可以选) bit,byte,int等虽然是 data type,但是只能和 var 搭配,所以也可以看成是 type- 可综合的设计,只使用
logic - automatic 主要是仿真用,设计时的 automatic 只有定义在 package 中的 task/function 使用
- 小心使用 static cast
Chapter 4 SystemVerilog User-Defined and Enumerated Types
SV 支持用户自定义数据类型,可以在保持准确性和可综合的前提下,让用户可以写出数量更少、可读性更好的语句在更高层次上对硬件进行建模。
user-defined types
typedef 可以根据需要定义在 module、package、$unit 中,一般来说,为了提高代码可读性,自定义类型的名称以 _t 结尾。
1 2 3 4 5 | |
enumerated types
verilog 中没有枚举类型,设计 FSM 时只能通过 parameter 或者是 define 的形式实现。SV 新增的枚举类型可以实现相同功能,代码可读性更好。
1 2 | |
如果 label 很多,而且都很有规律,一个一个写出来非常繁琐,SV 还提供了两种定义 label 序列的方法:
1 | |
显然,在同一个作用域内 label 必须是独一无二的,否则会发生冲突。
1 2 3 4 5 6 7 8 9 10 11 12 13 14 15 16 | |
enumerate 数据类型默认是 int 类型(32-bit 的 2-state 类型),list 中的第一个 label 的值为 0, 第二个为 1, 依次类推,每个 label 会根据前面的取值自动 +1,所以没必要把每个 label 的取值都显式地写出来。但是不同 label 的取值必须不同。
1 2 | |
enumerate 的类型也可以用户自定义,如果给 label 赋值则必须位宽匹配,否则会报错;如果 label 的数量超过了类型可以取值的数量也会报错;给 4-state 类型的 label 赋值了 x/z,那么下一个 label 必须显式赋值。
1 2 3 4 5 6 7 8 9 10 | |
enum 和 typedef 配合使用时,叫做 typed enumerated type,用 import 时只会导入 type name,并不会导入 label,所有 label 必须显式导入,或者通过通配符导入。
1 2 3 4 5 6 7 8 9 10 11 12 13 14 15 16 17 18 | |
大部分的 Verilog/SV 的 var 都是宽松类型,基本上任何类型的任何值都可以赋值给一个 var,在赋值时会根据规则自动转换成 var 对定的类型。enum 类型则是个 semi-strong type,只能用对应的 label、同类型的另外一个 enum、通过 cast 转换成对应 enum 类型的变量赋值。
1 2 3 4 5 6 7 8 9 10 | |
summary
Important
- typedef 可以提高代码可读性,命名使用
_t结尾 - enum 是 semi-strong type,可以提高设计的安全,import 时注意 label 的导入
Chapter 5 Systemverilog Arrays, Structures and Unions
struct
Verilog 中没有机制表示一组相关信号,只能通过信号前缀的方式来表示,SV 新增了类似 C 中的 structure,structure 内可以是任何类型的 variable,包括用户自定义的类型。
1 2 3 4 5 6 7 8 | |
strcut 可以是一组 var 也可以是一组 net,前面可以加上可选的 var 或 wire, bit 等,因为 net 本身要求是 4-state 类型,所以声明 net struct 时内部的所有成员也都必须是 4-state 的类型。虽然 struct 作为整体是可以声明为 net,但是 net 类型本身并不能作为 struct 内部的成员。可以用 interface 来实现同样的效果。
1 2 3 4 5 6 7 8 9 10 11 | |
struct 可以和 typedef 配合使用,没有 typedef 的 struct 叫做匿名 struct。struct 可以声明在 module 或 interface 内部使用,也可以定义在 package 中或 $unit 中供多个 module 使用。一般来说 struct 都是和 typedef 一起定义在 package 中,因为大多数情况下我们定一个 struct 的目的是为了在多个地方复用,比如在模块端口之间传递等。
1 2 3 4 5 6 7 | |
struct 和 array 很类似,它们的不同之处和 C 语言中的类似:
- array 是一组同类型、同宽度的信号,strcut 内的信号可以是不同类型、不同宽度
- array 中的信号通过下标来引用,strcut 中的信号通过名字来引用
struct 可以用 . 给每个成员单独赋值,也可以给整个 struct 赋值,但是两种方式不能混用。
1 2 3 4 5 6 7 8 9 10 11 | |
struct 默认是 unpacked 模式,即内部的成员是相互独立的,标准并不规定工具如何处理这些成员的存储关系;也可以声明成 packed 模式,packed strcut 内部的成员按照声明顺序存储,规则为:第一个元素在 MSB,依次类推。packed strcut 内部的成员可以通过名字来引用,也可以直接通过下标来引用。
1 2 3 4 5 6 7 8 | |
上面定义的 data_word 的存储格式如下:
1 2 3 4 | |
packed struct 存储时是按照 vector 处理的,所以对它的操作也和 vector 相同,可以对其进行数学运算、逻辑操作等。
1 2 3 4 5 6 7 8 9 | |
packed struct 还可以声明成 signed/unsigned 类型,主要会影响到其作为一个整体以 vector 类型参与数学运算和比较运算时的行为,但不会影响到内部成员的 signed/unsigned 的类型,每个成员仍然基于成员本身的声明类型。从 packed struct 中截取出的一部分永远是 unsigned 类型,这和 verilog 是一致的。
1 2 3 4 5 6 7 8 9 10 | |
module、interface、task/function 的端口也可以声明为 struct 类型:首先必须用 typedef 将其声明为用户自定义类型。
1 2 3 4 5 6 7 8 9 10 11 12 13 14 15 16 17 18 19 20 | |
Warning
unpacked struct 作为模块端口进行连接时,这两个模块的 strcut 类型必须是同一类型。即使两个模块各自定义了一套完全相同的匿名 struct,它们仍然是不同类型。所以必须用 typedef 将其声明为用户自定义类型才可以。
union
SV 中也新增了类似 C 语言的 union,其声明方法和赋值方法和 struct 类似。
1 2 3 4 5 6 7 | |
union 也可以和 struct 一样用 typedef 声明成用户自定义类型,如果没有 typedef 则是匿名 union。
-
unpacked union 是不可综合的
-
packed union 要求所有成员的 bit 位宽必须一致,所以 packed union 是可综合的。packed union 只能存储整数类型的数据,它可以按照一种类型写入,用另外一种类型读出,硬件模型不需要做任何特殊处理来保存数据是如何存储的,因为所有成员的位宽都相同
下面这个例子说明了 packed union 的两种表现方式:要么是一个 packed struct 方式的数据包,要么是一个数组
 1
 2
 3
 4
 5
 6
 7
 8
 9
10
11
typedef struct packed {
    logic [15:0] source_addr;
    logic [15:0] dst_addr;
    logic [23:0] data;
    logic [ 7:0] opcode;
} data_packet_t;

union packed {
    data_packet_t     packet;  // packed structure
    logic [7:0][7:0]  bytes;   // packed array
} dreg;
这两种方式的存储格式如下所示。
1
2
3
4
5
6
7
8
9
+-------------+----------+------+--------+
| source-addr | dst-addr | data | opcode |
+-------------+----------+------+--------+
 63            47         31     7      0

+----------+----------+----------+----------+----------+----------+----------+----------+
| bytes[7] | bytes[6] | bytes[5] | bytes[4] | bytes[3] | bytes[2] | bytes[1] | bytes[0] |
+----------+----------+----------+----------+----------+----------+----------+----------+
 63         55         47         39         31         23         15         7        0
一个 struct 和 union 的应用实例:
1 2 3 4 5 6 7 8 9 10 11 12 13 14 15 16 17 18 19 20 21 22 23 24 25 26 27 28 29 30 31 32 33 34 35 36 37 38 | |
Tip
SV 支持设计者自定义数据类型,在设计中某些信号(特别是端口信号)可能在不同模块中的含义是不一样的,所以需要支持数据类型动态变化,这是 union 存在的意义。举例:比如所有的 RV32I 的指令都是 32bit,但是可以分为不同的数据类型,那么可能在 IF 模块中指令信号是通用的 32bit 数据,而在 ID 模块中会变成各种类型的格式,这时候就可以把指令定义为 union 类型。
Union 只是语言上的小技巧,实现既可以支持自定义类型,又支持类型自动转化的效果,本质是还是一组宽 bit 信号。
array
unpacked array:
Verilog 中的 array 一次只能访问一个元素,或者是一个元素的一个切片,操作多个元素会报错。
1 2 3 4 5 6 | |
这种 array 在 sv 中叫做 unpacked array,array 中的元素是分开存储的,标准并不会规定工具如何存储。相对于 Verilog,SV 的增强之处在于可以声明任何类型的 array,包括用户自定义的类型,而且可以引用 array 整体或者是一个 slice,从而实现复制 array,需要注意的是,复制时等号两端的 array 维度和类型必须一致。
1 2 3 4 5 6 7 8 | |
SV 还支持简化版的 array 定义,就像 C 语言一样,只需要定义 array 的大小即可,但是这种写法不能用在 vector(packed arry) 中。
1 2 3 4 | |
packed array:
Verilog 中把位宽范围放在标识符前面的声明叫做 vector,把位宽范围放在标识符后面的声明叫做 array。SV 的叫法稍微不同,而且扩展了 packed array 使其可以声明成多维数组。
- vector = packed array
- array = unpacked array
1
2
3
wire [3:0] select;      // 4-bit packed array
reg [63:0] data;        // 64-bit packed array
logic [3:0][7:0] data;  // 2-D packed array: 4 8-bit sub-arrays
SV 定义了 packed array 的存储方式:像 vector 一样整个 array 必须连续存储,packed array 内部的每个维度都是 vector 的一个字段。上面例子中二维数组存储方式如下所示,这是协议规定的,和仿真器、编译器、操作系统、平台无关。
1 2 3 4 | |
packed array 只能用下面元素组成,
- bit-wise 类型:logic、bit、reg
- packed array, packed struct, packed union
- 任何 net 类型:wire
1
2
3
4
5
6
typedef struct packed {
    logic [ 7:0] crc;
    logic [63:0] data;
} dataword;

data_word [7:0] darray; // 1-D packed array of packed structures
packed array 可以按照一个元素、一部分 bit、一个 slice 的粒度访问:
1 2 3 4 5 6 7 8 9 10 11 12 13 | |
因为 packed array 是按照 vector 存储的,所以所有 Verilog 中对 vector 的操作对 packed array 也是合法的,包括:
- bit 选择
- 部分选择
- 数据拼接
- 数学操作
- 关系操作
- bit-wise 操作
- 逻辑操作
如果位宽不匹配,packed array 会被自动截断 / 扩展成符号左边的位宽,这个规则和 Verilog 是一致的。
packed 和 unpacked 都很灵活,那么什么时候应该用什么类型的 array 呢?
| 类型 | 用途 |
|---|---|
| unpacked array |
|
| packed array |
|
关于赋值,
-
packed array 赋值可以像 verilog 里面的 vector 赋值一样
1
2
3
4
5
6
7
logic [1:0][1:0][7:0] a; // 3-D packed arraay a[1][1][0] = 1'b0; // assign to one bit a = 32'hF1A3C5E7; // assign to full array a[1][0][3:0] = 4'hF; // assign to a part select a[0] = 16'hFACE; // assign to a slice a = {16'bz, 16'b0}; // assign concatenation -
unpacked array 可以用 SV 的新语法赋值
其中
'{}表明内部是一个 list,通过前面的单引号和 Vrilog 的拼接操作符区分,而且'{}、'{n{}}和 verilog 中的{}、{n{}}不同,后者内部需要明确每个元素的位宽,前者位宽声明是可选的。1 2 3 4
byte a [0:3][0:3]; a[1][0] = 8'h5; // assign to one element a = '{4'{7, 3, 0, 5}}; // assign a list to the full array a[3] = '{'hF, 'hA, 'hC, 'hE}; // assign a list to slice of array
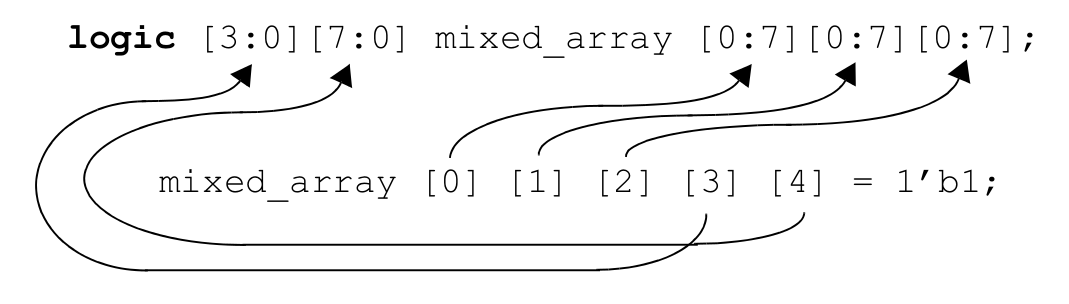
当 packed 和 unpacked 多维数组嵌套在一起时,数组的下标寻址规则如下:
- 首先寻址 unpacked array,从左到右的顺序
- 其次寻址 packed array,也是从左到右的顺序
用户自定义类型也可以用来组成 array,形成复合数据类型。
1 2 3 4 5 6 7 8 9 10 | |
Verilog 只允许 1-D 的 packed array 作为模块端口、task/function 参数,而 SV 允许任何类型的任何 array 作为端口。
1 2 3 4 5 6 7 8 9 10 11 | |
struct 和 union 也可以作为 array 的元素,需要注意的是 packed array 的元素也必须是 packed 类型。同理 array 也可以作为 struct/union 的元素,packed struct/union 的元素也必须是 packed 类型。
1 2 3 4 5 6 7 8 9 10 11 12 13 14 15 16 17 18 19 20 21 22 23 | |
foreach
有时候需要迭代处理 array 中的每个元素,一般都是通过 for 循环来处理,但是如果有很多个 for 循环或者是 array 的维度较多,则需要声明很多个 index,为了避免这一繁琐的声明,SV 新增了一种语法 foreach 来自动迭代,设计者不需要再手动声明每个 index 变量了。
1 2 3 4 5 6 7 8 | |
上面这个例子中:
- i, j 不需要声明,直接使用
- i, j 用逗号隔开,和维度的映射规则和前面说的嵌套 array 寻址相同,所以上例中 i 指向外层循环、j 指向内层循环
- 如果想跳过某一维度,可以用两个逗号跳过,如果是在尾部,直接不写出来即可
- 这些循环变量是自动生成的、只读、只对循环内部可见
array system function
大部分系统函数都是不可综合的,但是下面这些和 array 相关的系统函数是例外,它们是可综合的:
| 函数 | 功能 |
|---|---|
| $dimensions(array_name) | 返回 array 的维度 |
| $left(array_name, dimension) | 返回 array 特定维度的 msb |
| $right(array_name, dimension) | 返回 array 特定维度的 lsb |
| $low(array_name, dimension) | 返回 array 特定维度的最低位索引 |
| $high(array_name, dimension) | 返回 array 特定维度的最高位索引 |
| $size(array_name, dimension) | 返回 array 特定维度元素总数 $high - $low + 1 |
| $increasement(array_name, dimension) | 如果 $left >= $right 返回 1,否则返回 0 |
| $bits(expression) | 返回 expression 的总 bit 数(expression 的位宽是静态不变的,所以可综合) |
dynamic arrays, associative arrays, sparse arrays, strings
这些都是不可综合的。
summary
Important
- unpacked/packed struct 都是可综合的
- struct 可以作为端口在 module、interface、task/function 之间连接
- 只有 packed union 是可综合的,unpacked union 是不可综合的
- array 及其赋值是可综合的,包括
- array 声明:packed/unpacked 都是可综合的,维度可以是任意数
- array 赋值:给单个元素、部分 bit 位、单个元素的 part-select、array slice、整个 array 赋值,default 关键字也是可综合的
- array 复制:packed-to-packed、相同 layout 的 unpacked-to-unpacked 都是可综合的
- struct/union 中的 array 也是可综合的,其中 union 必须是 packed,所以其内部的 array 也必须是 packed
- struct/union 组成的 array 也是可综合的
- array 作为模块端口是可综合的
Chapter 6 Systemverilog Procedural Blocks, Tasks and Functions
Verilog 中的 always 块的用法很多,既可以对硬件建模写可综合的代码,可以在仿真中建模写不可综合的代码,所以有很多各种各样的规则,这对设计者、工具都提出了很高的要求,SV 通过新增语法解决了这些问题 :
- always_comb
- always_ff
- always_latch
awalys_comb
顾名思义,组合逻辑专用。和普通的 always 相比其好处是:
- 不需要再写出敏感列表,不会有漏掉信号的 bug
- 要求赋值语句的左侧信号不能在其他地方赋值,防止不符合组合逻辑的行为
- 工具不需要再推测设计意图
always_comb比always @*更好,因为always @*在有函数调用时推断出来的敏感列表可能不完整1 2 3 4 5 6 7 8 9 10 11 12 13 14 15 16 17 18 19
always @* begin // infers @(data) a1 = data << 1; b1 = decode(); end always_comb begin // infers @(data, sel, c, d, e) a2 = data << 1; b2 = decode(); end function decode; // function with no inputs begin case (sel) 2'b01: decode = d | e; 2'b10: decode = d & e; default: decode = c; endcase end endfunction
always_latch
和 always_comb 一样也不需要写出敏感列表,只是工具会自动推断出 latch,所以检查规则也略有变化。
1 2 | |
always_ff
同理,always_ff 用来对触发器进行建模,设计者必须提供敏感列表,而且每个信号前面必须有前缀 posedge 或者是 negedge。
1 2 3 4 5 | |
task/function
SV 对 task/function 也做了一些增强,主要包括下面几点:
-
不再强制要求
begin ... end,会自动推断出来1 2 3 4 5 6 7 8
function states_t NextState (states_t State); NextState = State; case (State) WAITE: if (start) NextState = LOAD; LOAD: if (done) NextState = STORE; STORE: NextState = WAITE; endcase endfunction -
Verilog 中的 function 名字本身就是一个变量,返回值就是对同名变量赋值,最后一次给函数名所赋的值就是返回值。SV 新增了 return 语句,而且 return 语句的优先级高于同名变量,即如果有 return 语句,可以把同名变量当成一个临时变量来用
1 2 3 4 5 6 7 8
function int add_and_inc (input int a, b); return a + b + 1; endfunction function int add_and_inc (input int a, b); add_and_inc = a + b; return ++add_and_inc; endfunction -
新增的 void function 可以不必有返回值,可以像普通语句一样调用,就像 task 一样
1 2 3 4 5 6 7 8 9 10 11 12 13 14 15
typedef struct { logic valid; logic [ 7:0] check; logic [63:0] data; } packet_t; function void fill_packet ( input logic [63:0] data_in, output packet_t data_out ); data_out.data = data_in; for (int i=0; i<=7; i++) data_out.check[i] = ^data_in[8*i +: 8]; data_out.valid = 1; endfunction -
Verilog 只运行按位置传参,错误的传参顺序可能导致错误;SV 新增了按名传参,可以减少犯错的机会
1 2
always @(posedge clk) restult <= divide(.denominator(b), .numerator(a)); -
Verilog 中的 function 只能有 input 参数,唯一的 output 参数就是函数名;SV 为 function 新增了 output 参数。为了保证可综合性,带 output 的 function 不能出现在连续赋值语句中
-
Verilog 要求 function 至少有一个参数,即使内部不会用到这个参数;SV 允许 function 不带参数,前面 always_comb 有个实例
-
Verilog 要求每个参数都必须有 input/output 表明方向;SV 简化了语法,参数默认的方向是 input,除非明确声明了方向,后续的参数都是这个方向。同时 SV 默认参数是 logic 类型
1 2 3 4 5 6 7
function int compare (int a, b); ... endfunction task mytask (a, b, output y1, y2); ... endtask -
SV 还允许 funciton 参数有默认值,这样调用时如果不涉及,可以不传递这个参数
1 2 3 4 5 6
function int incrementer(int cout=0, step=1); incrementer = count + step; endfunction always @(posedge clk) result <= incrementer(data_bus); -
struct、union、array 都可以作为 function 的参数
summary
Important
always_comb,always_latch,always_ff都是可综合的,用它们取代always增强设计- 用 void function 代替 tasks,提高设计的安全性
Chapter 7 Systemverilog Procedural Statements
SV 新增了一些新语法和新的操作符,可以让设计者写出更加精简的可综合 RTL 代码。
new operators
自增 / 自减操作符: ++, --
类似 C 语言,赋值和自增 / 自减有先后之分。因为 SV 中有阻塞 / 非阻塞两种赋值方式,++ 和 -- 的行为和阻塞赋值是一样的。
Warning
不要在非阻塞赋值中使用自增 / 自减操作符。也就是说它们只能用来对组合逻辑进行建模,不能用在时序逻辑中。(例外情况:类似 for 循环下标这种用法,不是真正的信号)
1 2 3 4 5 6 7 8 9 10 11 12 13 14 15 16 17 | |
赋值操作符
以 += 为例,
1 2 | |
除了加法,= 还可以和其他操作符结合,所有新增赋值操作汇总如下。
+=, -=, *=, /=, %=, &=, |=, ^=, <<=, >>=, <<<=, >>>=。
所有的赋值操作符的行为也和阻塞赋值一样,所以和自增 / 自减一样,只能用在组合逻辑建模中。
带 don't care 的等价操作符
Verilog 中有两种等价操作符 == 和 ===,SV 新增的操作符 ==? ,它们的区别在于对 x/z 的判断。
==:只要任何一个操作数带 x/z,返回结果是 1'bx===:bit-wise 比较,要求 1, 0, x, z 精确匹配,完全一样才返回 1‘b1,否则返回 1'b0 |==?:右操作数中的 x/z 当成是通配符,和左操作数对应 bit 的任何值都匹配!=?:对==?取反
Note
- 如果左右位宽不匹配,会在比较前做位宽扩展,扩展规则和逻辑比较
==的规则相同 ==?和!=?可综合的前提是右操作数是常数,即不能是可变化的信号值。
判断是否存在 inside
类似于 Python 中的 in 效果。inside 是可综合的,但是很多综合工具可能并不支持。
1 2 3 4 5 6 7 8 9 | |
for loops
Verilog 中 for 循环的 index 变量必须声明在循环外部,如果一个模块中有多个 for 循环,而且要保证名字相互之间不同,或者把声明放到 always 块中,这时候才可以重名。
SV 做了一下增强:
-
可以在 for 循环中定义局部变量,不同 for 循环的局部变量可以重名
1 2 3 4 5
always_ff @(posedge clk) for (bit [4:0] i = 0; i <= 15; i++) always_ff @(posedge clk) for (int i = 0; i <= 1024; i++)需要注意的是,这种变量是 automatic 类型,而 automatic 类型的变量有以下限制:
- automatic 变量不能在外部访问
- automatic 变量无法 dump 到 VCD 文件中
所以 for 循环外部是无法访问这个变量的,如果一定要访问,那么就要挪到 for 外部定义。
-
一次可以声明多个变量,和 C 语言类似
1 2 3
for (int i=1, j=0; i*j < 128; i++, j+=3) for (int i=1, byte j=0; i*j < 128; i++, j+=3)
do...while loop
do...while 和 while 一样,在某些限制条件(这些条件是要能让综合器可以静态地判断循环次数,和 for 类似)下是可综合的,一般来说 RTL 中不会使用这两种语法,略。
foreach
见 Chapter 5 中关于 array 部分。
jump statements
SV 新增的 break, continue, return 都是可综合的,规则和 disable 一样。(一般很少用)
1 2 3 4 5 6 7 8 9 10 11 12 13 14 15 16 17 18 19 20 21 22 23 24 25 26 27 28 29 30 31 32 33 | |
block names
当有多层 begin...end 嵌套时,即使有缩进,有时候也很那找到 end 对应的 begin,SV 支持给 end 后面也加上 name,这个特性对综合没有任何影响,只是为了提高代码可读性。
Warning
end 后面的名字必须和匹配的 begin 名字相同,否则会报错。
1 2 3 | |
statement label
SV 还支持给单个语句加上 label,就和 begin...end 块一样,不过语法是类似 C 语言的风格。给语句加上 label 的好处很多,
- 提高代码可读性
- 方便文档 / 其他地方引用具体语句
- 帮助 debug 工具和 coverage 工具分析
begin...end 块也是一个 statement,所以也可以给它加上 label。
Warning
begin...end 块不能同时使用 label 和 block name。
1 2 3 4 5 6 7 8 9 10 11 12 13 14 15 16 17 | |
case statement
Verilog 标准特意规定了 case 语句的选择必须是按照顺序来评估,所以暗含着优先级。会得到类似 if-else-if 的效果。如果设计本身没有优先级时,综合工具要做特别的处理,把优先级逻辑优化掉。
SV 为此特意定义了两个描述符来限定 case 语句:
-
unique case表示无优先级的 case,它要求表达式和 case item 之间必须是一一映射的关系,表达式必须能且只能匹配一个 item,否则会报错。unique case 和 always_comb 配合使用,这两个特性带来的额外检查可以提高 RTL 的综合结果符合设计意图。1 2 3
unique case (<case_expression>) ... // case items endcase -
priority case表示有优先级的 case,它要求表达式至少要匹配一项 item,如果有多项匹配时,选择对一个匹配项。使用这个限定符表示设计者是有意这么做的,有多个匹配项也符合设计意图。有时候即使使用了 priority,如果 case item 本身是不可能同时匹配,那么综合工具也会自动把优先逻辑优化掉。1 2 3
priority case (<case_expression>) ... // case items endcase
Verilog 中定义了两个 program 来帮助综合工具,
parallel_case:告诉综合工具去掉优先级逻辑,所有分支是并行同级关系full_case:未使用到的 expression value 是无关紧要的,可优化掉这部分逻辑
所以 unique case 实际上就相当于同时使能了 full_case 和 parallel_case,而 priority case 相当于只使能了 full_case。但是使用这两个新语法比 program 更健壮,可以减少风险。
if...else
unique 和 priority 也可以用来限定 if-else 语句。仿真工具会按照我们书写顺序来评估每个条件,综合工具也会产生优先级逻辑来保持和仿真的一致性,但是通常,我们书写顺序并不是真正想要的效果。
-
unique if...else表明设计者并不关心优先级,综合工具可以把优先级逻辑优化掉。1 2 3 4 5 6
logic [2:0] sel; always_comb begin unique if (sel == 3'b001) mux_out = a; else if (sel == 3'b010) mux_out = b; else if (sel == 3'b100) mux_out = c; end -
priority if...else表明设计者关心优先级,所以工具要保留优先级逻辑。
summary
Summary
++和--都是可综合的,但是工具支持并不好,为了健壮性,避免使用这两个操作符- 新增的赋值操作符是可综合的,有些综合工具对部分操作符有限制,为了健壮性,避免使用这些赋值操作符
==?和!=?可综合的前提是右操作数是常数- 增强性 for 循环也是可综合的,和 Verilog 中的 for 规则相同
do...while在某些条件下是可综合的,避免使用break,continue,return都是可综合的,避免使用unique和priority都是可综合的,可以提高设计的健壮性
Chapter 8 Modeling Finite State Machine with Systemverilog
使用前面 7 章介绍的新特性,使用 FSM 对一个交通灯控制系统建模的例子。和传统 Verilog 相比,有以下特点:
- 统一使用
logic代替reg/wire - 使用
always_comb和always_ff代替通用always - begin...end 加了 name
- 使用 enum 类型描述所有状态
- 明确类型为
logic(默认是int,32-bit 2-state) - 明确给出 label 的取值(方便控制编码类型,比如 one-hot, one-cold, binary 等)
- enum 变量只能用 label 赋值,不要用数字给 enum 变量赋值,也不要给部分 bit 赋值
- 明确类型为
- 使用
unique case代替普通 case- 如果是 one-hot 编码,可以调换 case expression 和 case selection items 的位置,某些综合工具下面积更优
1 2 3 4 5 6 7 8 9 10 11 12 13 14 15 16 17 18 19 20 21 22 23 24 25 26 27 28 29 30 31 32 33 34 35 36 37 38 39
module traffic_light (output logic green_light, yellow_light, red_light, input sensor, input [15:0] green_downcnt, yellow_downcnt, input clock, resetN); enum {R_BIT = 0, G_BIT = 1, Y_BIT = 2} state_bit; enum logic [2:0] {RED = 3'b001 << R_BIT, // explicit enum definition GREEN = 3'b001 << G_BIT, YELLOW = 3'b001 << Y_BIT} State, Next; always_ff @(posedge clk, negedge resetN) if (!resetN) State <= RED; else State <= Next; always_comb begin: set_next_state Next = State; // the default for each branch below unique case (1'b1) // reversed case statement State[R_BIT]: if (sensor) Next = GREEN; State[G_BIT]: if (green_downcnt == 0) Next = YELLOW; State[Y_BIT]: if (yellow_downcnt == 0) Next = RED; endcase end: set_next_state always_comb begin: set_outputs {red_light, green_light, yellow_light} = 3'b000; unique case (1'b1) // reversed case statement State[R_BIT]: red_light = 1'b1; State[G_BIT]: green_light = 1'b1; Staet[Y_BIT]: yellow_light = 1'b1; endcase end: set_outputs endmodule
- 如果是 one-hot 编码,可以调换 case expression 和 case selection items 的位置,某些综合工具下面积更优
Chapter 9 Systemverilog Design Hierarchy
module prototypes
大型设计可能会分散定义在几十个文件中,在模块中例化另外一个文件中的模块时,综合工具要做大量工作,包括检查这个文件的模块的定义,包括端口数量、端口位宽、甚至是端口顺序。SV 提供了 external module 语法在例化该模块的文件中声明模块原型,可以简化综合步骤。
声明方式有两种:
1 2 3 4 5 6 7 8 9 10 | |
声明模块原型可以写在任何地方:在 module/interface 之外的声明实际上定义在 $unit 中,这时模块原型声明对于和这个文件一起综合的其他文件来说都是可见的。
原型和模块的实际定义必须严格一致:包括端口顺序、端口位宽都必须相同,如果不同会报错。
如果模块参数、端口非常多,重复写两遍非常麻烦,SV 提供了新语法 .* 解决这个问题。
1 2 3 4 5 6 7 8 9 10 11 12 13 14 15 | |
named ending statements
前面介绍了 SV 允许给 begin...end 后面加上名字,以提高代码可读性,实际上很多代码块都可以加上名字:
- begin...end
- package...endpackage
- interface...endinterface
- task...endtask
- function...endfunction
- module...endmodule
nested module declarations
Verilog 中的模块默认是全局的可见的,所以在设计中的任何地方都可以访问这些模块的定义。这个机制简单强大,但是有两个问题:
- 模块访问是无限制的,但是有时候我们希望隐藏某些模块,防止外部访问
- 大型设计中可能产生命名冲突
Verilog 虽然可以通过配置文件的方式解决问题,但是不够优雅。SV 为解决这个问题提供了一种方法:嵌套的模块定义。和 C 语言类似,嵌套的模块定义只能被父模块或者是同一层级结构的模块访问。
为了可维护性一般都是一个文件放一个模块,且文件名和模块名相同,嵌套模块的方式显然违背了这个原则,所以嵌套模块应该和 `include 配合使用。
1 2 3 4 5 6 7 8 9 10 11 12 13 14 | |
simplified netlists of module instances
Verilog 提供了两种端口连接方式:
- 按端口顺序连接:缺点太多,大部分情况都被禁止使用
- 按端口名连接:优点是不容易出错,缺点是模块和端口数量较多时非常繁琐
SV 提供了三种新的连接方式:
-
.name方式:在许多端口连接上,信号名和端口名是一致的,这个时候就可以用这种方式,结合了端口顺序和端口名两种方式的优点。1 2 3 4 5
prom prom ( .dout (program_data), .clk, .address (program_address) );Note
- 必须声明和端口同名的,用于连接的 var / net 信号
- 连线的位宽必须和模块端口保持一致
- 两个端口的也必须兼容
- 无法使用 .name 方式连接的端口必须用端口名连接
-
.*方式:比 .name 更进一步,例化模块时连信号名都不需要写,直接用通配符来匹配(条件同 .name)1 2 3 4 5
prom prom ( .*, .dout (program_data), .address (program_address) ); -
interface 方式:见下一章
net aliasing
SV 新增了信号别名的语法,给信号起别名的 assign 语句有点像,但是并不完全相同。因为 assign 是单方向的,等号右边的信号的值可以传递给左边,但是左边的值无法传递给右边,而 alias 是双向的,因为本质上多个名字指向的是同一个资源。
1 2 3 4 5 6 7 | |
使用别名有几个约束:
- 只能给 net 类型起别名
- 只能在相同类型的 net 直接使用别名
- 别名必须位宽相同
别名也不需要预先显式地声明好才能用,它遵守 Verilg 中模块端口的隐式推断规则可以由工具自动推断出来:
- alias 两端任何一个未声明的名字都会自动推断出一个 net 类型信号
- 默认是 wire 类型
- 如果 net 是模块端口信号,则其位宽和端口一致
- 如果 net 不是端口信号,则默认是 1-bit
虽然 .* 可以减少工作量,但是有个前提条件是:模块端口名必须一样,否则还是得用传统的端口连接方式。而这个问题可以通过 alias 解决:只需要先用 alias 把不同端口名设置为别名即可,这些模块例化时端口列表只写 .* 即可。
pass values through module ports
Verilog 对什么信号可以做作为模块端口有严格的约束,而 SV 基本上把这些限制都去掉了,基本上任何类型都可以作为模块端口,包括任何类型的 packed/unpacked 数组、structure、union、用户自定义类型等。
但是 SV 还是有两个约束,这两个约束都非常直白,都是为了建模的准确性而设立的:
- 第一条是:var 类型只能有一个源驱动。因为 SV 中的 var 只是简单地保存赋值,所以有多个赋值时会保存最后一个赋值,而硬件在多驱动时的硬件行为并不是这样。所以 SV 要求只有 net 类型信号可以有多驱动。
- 所有 unpacked 类型的信号(struct、union、array)作为端口连接时,必须一模一样,包括维度的数量、每个维度的大小、每个元素的位宽都必须一样。(隐含条件,struct、union 必须用 typedef 才能作为端口连接)。这个条件对 packed 类型并不其作用,因为 packed 类型是按照 vector 来处理的,SV/Verilog 有相应的规则处理位宽不匹配的情况
reference ports
不可综合,略。
enhanced port declarations
Verilog-1995 风格的端口声明已经没有人用了,但是 Verilog-2001 还是有点繁琐,
- 所有端口都必须显式声明方向
- 多个端口一起声明时,如果要改数据类型则必须连带方向一起声明(下例中的 a, b 和 ci)
- 多个端口一起声明时,如果要改变端口位宽必须连带方向一起声明(下例中的 result 和 co)
1 2 3 4 5 6 7 8 9 10 11 12 13 14 15
// verilog-2001 module accum (inout wire [31:0] data, output reg [31:0] result, output reg co, input [31:0] a, b, input tril ci ); ... endmodule // SV module accm (wire [31:0] data, output reg [31:0] result, reg co, input [31:0] a, b, tril ci); ... endmodule
Note
一般为了代码健壮性、减少错误,大部分 coding style 都规定还要一行一个端口地声明,不会用到这个特性。
parameterized types
Verilog 中的 parameter 只能参数化端口位宽,SV 新增了一个可综合的新语法 parameter type,可以对端口类型进行参数化,进一步提高了模块的多态性。实际上 Verilog 模块端口类型一般只有 wire/reg,而且是固定的,所以也不需要对类型参数化,而 SV 中有很多类型,甚至用户可以自定义类型,所以类型参数化就有必要了。
1 2 3 4 5 6 7 8 9 10 11 12 13 14 15 16 17 18 19 20 21 22 23 | |
summary
Important
- 必要时给 begin...end 后面加上 name,增强可读性
- nested module 和 `include 配合使用
- 顶层集成用
.*配合 alias 减少工作量 - 为了减少错误,避免使用增强型的端口声明语法
Chapter 10 Systemverilog Interfacees
concepts
Verilog 中是通过模块端口进行连接,这种方式在端口数量非常多的时候很繁琐,比如说多个模块连接到总线上时,
- 每个模块定义处都要声明总线的所有信号
- 顶层集成时也要把每个模块的所有端口都写出来
- 信号很多时连线可能出错
- 如果总线变了,多个地方都要同步修改
SV 新增了一个叫 interface 的语法,可以把一组端口定义成一个端口,这样使用 / 修改起来就非常方便了。interface 并不是简单的把信号组合打包在一起,它里面还可以定义其他功能代码,比如其他离散的信号、接口的协议、检查协议的验证代码等:
- type declration
- task/function
- procedural block
- program block
- assertion
1 2 3 4 5 6 7 8 9 10 11 12 13 14 15 16 17 18 19
interface main_bus; wire [15:0] data; wire [15:0] address; logic [ 7:0] slave_instruction; logic slave_request; logic bus_grant; logic bus_request; logic slave_ready; logic data_ready; logic mem_read; logic mem_write; endinterface module processor ( main_bus bus, output logic [15:0] jump_address //...); endmodule
interface declration
从语法上来说,interface 的定义和 module 非常像,interface 也可以有端口,这样外部信号就可以被引入 interface 成为信号的一部分。Interface 内部还可以定义任何数据类型,包括 var、net、用户自定义类型等。
Interface 可以定义在全局,就和普通 module 一样,其他 module 可以直接使用 interface,编译顺序对工具没有影响,所以 interface 可以先使用后编译。Interface 也可以定义在一个 module 内部,仅限内部使用。
1 2 3 4 5 6 7 8 9 10 11 12 13 14 15 16 17 | |
using interface as module ports
Interface 可以作为 module 端口的一部分,而且不需要声明 input/output 等方向。一共有两种方式声明 interface 端口:
- 使用 interface 的名字来声明 module 端口,这种端口只能连接到同名的 interface 端口上,目的是避免端口不匹配(推荐使用)
- 直接用
interface这个关键字来声明端口,这种是通用的 interface 端口,其他任何类型的 interface 端口都可以连接到这个端口上(避免使用)
这两种写法都是可综合的。
1 2 3 4 5 6 7 8 9 10 11 12 13 14 15 16 17 18 | |
instantiating and connecting interface
interface 和 module 一样都可以例化,然后连接起来,连接的语法也和 module 一样,可以用 .name,.* 等方式(前面 main_bus 的例子)。interface 还可以嵌套,比如 sub_bus 和 main_bus 都可以定义成 interface,且 sub_bus 是 main_bus 的组成部分。
Warning
一个 module 的 interface 端口必须连接到其他 interface instance 或者是另外一个 module 的 interface 端口上,不能悬空。
referencing signals within an interface
使用 interface 中的信号必须通过下面的方式:
1 2 3 4 | |
因为这种方式必须把端口名前缀加上,所以为了减少工作量、提高可读性,建议给 port 起个简短的名字。
interface modports
interface 为模块端口连接提供了一种新方式,但是从不同模块的角度看,端口是不一样的。比如一组总线,从 slave 模块看,interrupt_request 很可能是输出端口,而从 master 模块看,它是一个输入端口。SV 提供了一种新语法来解决这个问题:用 module port 的缩写 modport 关键字来定义端口。一个 interface 可以有任意多个 modport,每个 modport 描述了每个相关模块角度看到的 interface 端口的方向。
1 2 3 4 5 6 7 8 9 10 11 12 13 14 15 16 17 18 | |
如上所示,modport 的定义不需要包含 vector 的位宽及数据类型(这些信息在 interface 中已定义好),只需要定义方向即可。
定义好之后,具体使用时要声明是从哪个角度看待 interface,即要选择具体是哪个 modport。SV 提供了两种方式:
-
modport 作为 interface 的一部分在模块例化时确定(避免使用)
同时例化一个 module 和 interface,然后在连接它们时确定 modport。
1 2 3 4 5 6 7 8 9 10 11 12 13 14 15 16 17 18 19 20 21 22 23 24
// <interface_instance_name>.<modport_name> interface chip_bus (input logic clock, resetN); modport master (...); modport slave (...); endinterface module primary (interface pins); // generic interface port ... endmodule module secondary (chip_bus pins); // specific interface port ... endmodule module chip (input logic clock, resetN); chip_bus bus (clock, resetN); primary i1 (bus.master); secondary i2 (bus.slave); endmodule -
modport 作为模块端口的一部分在模块定义时确定(推荐使用)
1 2 3 4 5 6 7 8 9 10 11 12 13 14 15 16 17 18 19 20 21 22 23 24
// <interface_name>.<modport_name> interface chip_bus (input logic clock, resetN); modport master (...); modport slave (...); endinterface module primary (chip_bus.master pins); ... endmodule module secondary (chip_bus.slave pins); ... endmodule module chip (input logic clock, resetN); chip_bus bus (clock, resetN); primary i1 (bus); secondary i2 (bus); endmodule
这两种风格都是可综合的,但是只能选择其中一种,不能同时混用:在定义和例化时都使用 modport 会报错。
即使 interface 中定义了 modport,但是实际中没有使用时,信号会有默认的方向:
- 所有的 net 都是双向端口
inout - 所有的 var 都是
ref类型端口
在实际使用过程中,很有可能出现这种情况:interface 定义了一大组信号,但是不同 module 分别只需要看到其中的部分信号。显然把 interface 的所有信号都连到每个 module 上很浪费;而为每个 module 定义各自的 interface 又失去了 interface 的意义。
使用 modport 可以为每个 module 定义一种不同的 interface view,从而解决这个问题。因为每个 module 只能访问 modport 内的信号,所以可以利用这个特性对某些 module 隐藏 interface 中的特定信号。如果一个 module 没有用 modport 连接 interface,那么 interface 中定义的信号这个 module 都可以访问。
using task/function in interface
假设有个 master 和 slave 通过总线交互的场景,在传统的 Verilog 代码中,master 和 slave 必须各自包含一些监控端口和处理握手的逻辑。这些逻辑分散在 master 和 slave 模块的定义中,会导致功能重叠的代码,而且不易维护,一旦总线有任何修改,相应的所有模块都需要修改。
SV 的 interface 内部可以定义 function/task,从而可以把总线相关的逻辑功能代码都放在 interface 中集中管理,这样相关逻辑代码只需要写一次。这些 function/task 叫做 interface method,它们可以像在 module 中一样,访问 interface 内的任何信号。具体使用时,module 首先连接到 interface,然后通过端口名前缀的方式就可以使用某个 method 了。
如果 interface 是通过 modport 使用,那么 method 必须通过 import 导入在 modport 内,有两种方式可用:
-
通过 method 名导入
1
2
3
4
5
// modport (import <task_function_name>); modport in (import Read, import parity_en, input clock, resetN); -
通过 method 原型导入
这种方式要求 import 后面加上 task/function 关键字,method 名字后面还要有包含参数的圆括号。如果 interface 定义在另外一个 package 文件中时,这种方式可以提高代码可读性。
1 2 3 4 5 6 7
// modport (import task <task_name>(<task_formal_arguments)); // modport (import function <function_name>(<formal_args)); modport in (import task Read(input [63:0] data, output [31:0] address), import function parity_gen(input [63:0] data), input clock, resetN);
通过 modport 把 function/task 导入之后,module 就可以使用这些逻辑了,使用方式和使用 interface 内的信号一样,加上 interface 端口名前缀即可。
Warning
为了保证可综合,导入的 task/function 必须是 automatic 类型,而且内部不能包含 static 声明。
1 2 3 4 5 6 7 8 9 10 11 12 13 14 15 16 17 18 19 20 21 22 23 24 | |
using procedural blocks in interface
interface 内部还可以定义 always, always_comb, always_ff, always_latch, initial, final, assign 等语句块,在 Interface 中定义这些语句块的一种应用场景是做验证:在 interface 中定义相关协议的 checker,这样每次通过 interface 传递数据时,内置的 checker 会自动检查是否满足相关约束。
reconfigurable interface
interface 可以像 module 一样使用 parameter,也可以使用 generate 语句,所以可以定义参数化的 interface,方便复用。 (example 10-12)
summary
Important
- named interface port 和 generic interface ports 都是可综合的
- modport 的两种使用方式都是可综合的
- module 导入 interface 中的 function/task 是可综合的,综合时会自动在模块中产生一份本地电路,综合后的模块内已经包含了这些逻辑,不再需要去 interface 中查询
- 永远不要使用 task,用 void function 代替 task
Chapter 11 A Complete Design Modeled with SystemVerilog
一个用 SV 设计的通信领域的异步传输机制 ATM (Asynchronous Transfer Mode) 原型,用到了以下特性:
| 问题 | 解决方法 |
|---|---|
| 动态表示相同长度的两种数据包 | 用 packed struct + packed union 封装不同数据类型 |
| 定义总线 | 用 interface(modport + method) 封装总线接口和协议、简化代码 |
| 定义多种实现方式 | 带 parameter 的可重定义 interface |
| 全局定义 | 类似 C 语言的 include 头保护 ifndef...define...endif |
| 定义状态机的状态 | enum 类型 |
| 定义状态机跳转 | 使用 unique case |
| generate 语句 | index 自增减少代码量 |
| 多层 begin...end 嵌套 | 加上 label 增强可读性 |
| 封装功能代码 | module 内定义 function |
Chapter 12 Behavioral and Transaction Level Modeling
虽然有些特定的综合工具可以处理特定的 TLM,大部分情况下 Transaction Level Modeling(TLM) 大部分情况下都是不可综合的,略。
附录
一些 SV 的参考资源:
| 类型 | 资源 |
|---|---|
| Syntax | |
| Coding Style |